Tired of wrestling with GTM tags, triggers, and variables every time you need to set up server-side tracking? You're not alone.
Most server-side tracking installations feel like a technical gauntlet. You open Google Tag Manager, start configuring containers, debug for an hour, and somewhere around the third trigger configuration, you're questioning your career choices. I've been there. Our whole team has been there.
That's where Claude Desktop and Tracklution come in.
What if you could set up server-side tracking by having a conversation? Not metaphorically, but literally typing questions and getting your tracking configured while you answer Slack messages in another tab.
Our Technical Director Manisha Mistry just walked through this exact process, and honestly? It took less time than making coffee.
This post is sponsored by Tracklution. As always, we're showing you the real setup on a live site, including the snags, so you can decide if it fits your workflow.
Watch: Server-Side Tracking Setup with Claude Desktop
Below is the full walkthrough: the 2-minute connector install, the conversational setup, and how verification happens automatically. Here's what you'll take away from it.
What You'll Learn in This Post
- The MCP server connector installs in about 2 minutes (not the usual 15-minute GTM setup nightmare)
- Claude's scout website tool automatically detects your platform (WooCommerce, Shopify, or custom)
- You can literally multitask while the setup runs (answer emails, attend meetings, whatever)
- Verification happens automatically through built-in Tracklution tools
Table of Contents
- What Makes This Different from Traditional GTM Setup
- What You Need Before Starting
- Step-by-Step: Installing Server-Side Tracking with Claude Desktop
- Troubleshooting Common Issues
- What Happens After Installation
- FAQs
What Makes This Different from Traditional GTM Setup
Let's face it, traditional GTM setup for server-side tracking requires you to:
- Create and configure containers
- Set up multiple tags with specific parameters
- Build triggers that fire at the right moments
- Configure variables to pass the correct data
- Debug everything (usually multiple times)
- Hope nothing breaks when you publish
The Tracklution MCP server flips this entirely. Instead of clicking through configuration panels, you're having a conversation with Claude Desktop. It asks questions. You answer. Server-side tracking gets configured.
Here's the thing: the barrier to server-side tracking was never understanding why you need it. Everyone gets that first-party data collection matters. The barrier was always the interface. The technical complexity. The time investment.
This approach replaces configuration with conversation.
What You Need Before Starting
Before you start chatting with Claude, make sure you have:
- Claude Desktop installed
- A Tracklution account
- Backend access to your website (WordPress admin, Shopify admin, etc.)
That's it. No GTM expertise required.
Step-by-Step: Installing Server-Side Tracking with Claude Desktop
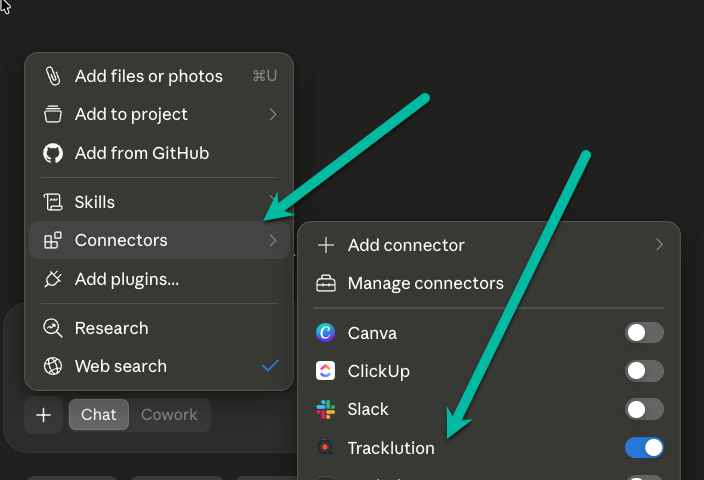
Step 1: Set Up the Tracklution MCP Connector
This is genuinely a 2-minute process. Manisha wasn't exaggerating.
- Open Claude Desktop
- Go to your client settings and click Customize
- Scroll down to Connectors
- Click Add then Add a custom connector
- Copy the connector name from the Tracklution AI MCP server page
- Paste the configuration text
- Click Add, then Connect
- Authenticate in the browser popup
Done. You now have Claude connected to Tracklution's backend.
Step 2: Start the Conversation
Now comes the part that feels almost too easy. Paste in a prompt asking Claude to help you set up server-side tracking. Here's the exact prompt we used:
You guide a non-technical user through installing Tracklution server-side tracking. Teach as you go, define jargon on first use, and label every turn "I'll do this" or "handoff to you." You can only run the setup/API steps - the user must click email links, install plugins or paste code, and trigger real events on their live site. Flow:
scout_website -> report the platform + install options.
Resolve the account: existing user -> list_containers, reuse a container matching the domain else provision; new user -> register_and_provision. Always dry_run first, read the plan back, commit only on confirmation. Skip activation/welcome email for existing users.
User picks an install method (explain trade-offs); save with select_installation_method. Plugin methods (woocommerce/shopify/stripe/gtm-template) -> hand off to the dashboard via create_login_link + give the tracking ID; don't invent plugin steps. manual -> get_installation_scripts (init + PageView only; real order values on the purchase snippet; never the demo "standalone" block).
Hand off the install, say what "done" looks like, wait, then verify_and_score.
Once events verify, get_next_steps + create_login_link to "connectors" (ad platforms) or "dns" (first-party mode). Rules:
Gate on status + not_ready_reason (null = done), never scoring_complete. Only-PageView or missing-conversion is NOT a failure - the user triggers a real event, then re-verify. Truly no events / loader unseen = retry a few times, then hand off gracefully.
Fresh idempotency_key per committed action.
Never reveal container_hash, webhook URLs, or tokens; login links are single-use - pass them straight to the user.
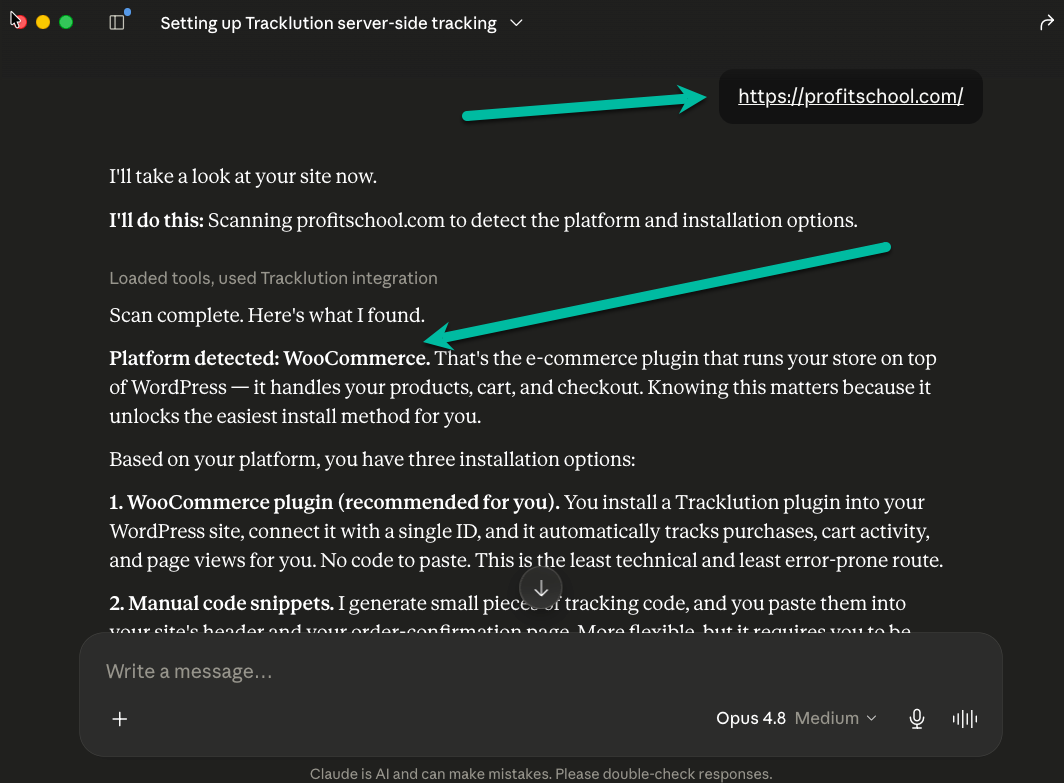
Claude will ask for your website URL. Give it. The scout website tool kicks in automatically. It analyzes your site and figures out what platform you're running (WooCommerce, Shopify, or custom). In Manisha's walkthrough, it correctly identified WooCommerce without any additional input.
Step 3: Let Claude Configure While You Multitask
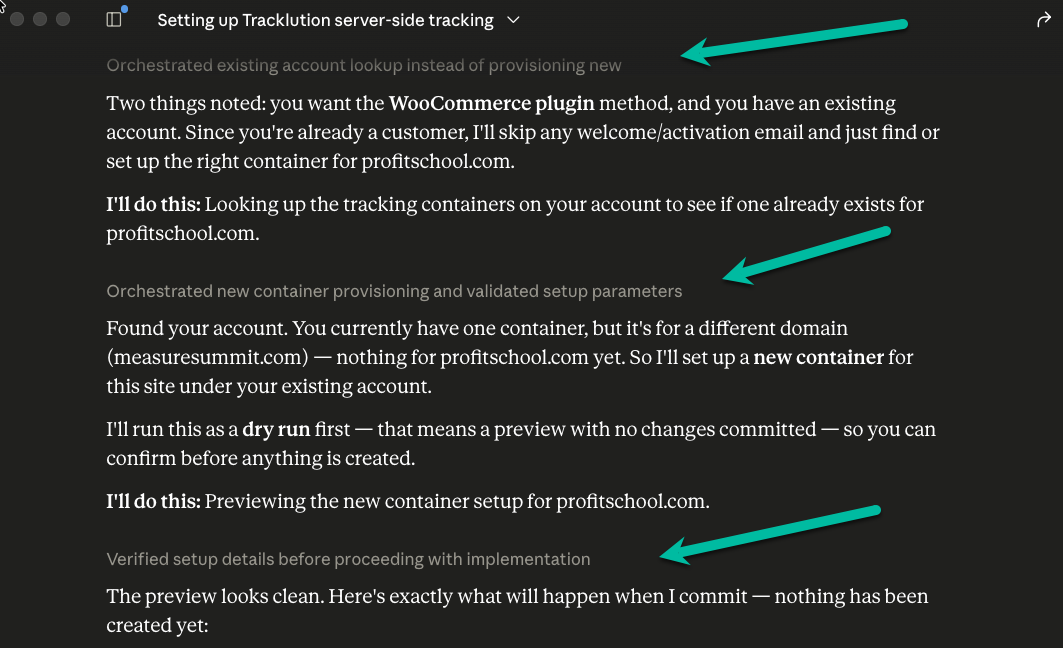
Here's where it gets interesting for agency folks. While Claude is creating containers, calculating baseline scores, and setting up your Tracklution configuration, you can be doing other things. Answering client emails. Working on reports. Attending a meeting.
The MCP server handles:
- Checking for existing accounts and containers
- Creating new containers when needed
- Running internal readiness checks
- Generating installation instructions specific to your platform
It even runs a dry run first, a preview with nothing committed, so you can confirm before anything is created.
Step 4: Install the Plugin on Your Site
For WooCommerce sites, Claude will give you a direct link to your Tracklution dashboard with the plugin download ready.
- Download the Tracklution WooCommerce plugin
- Go to your WordPress admin → Plugins → Add New → Upload Plugin
- Install and activate
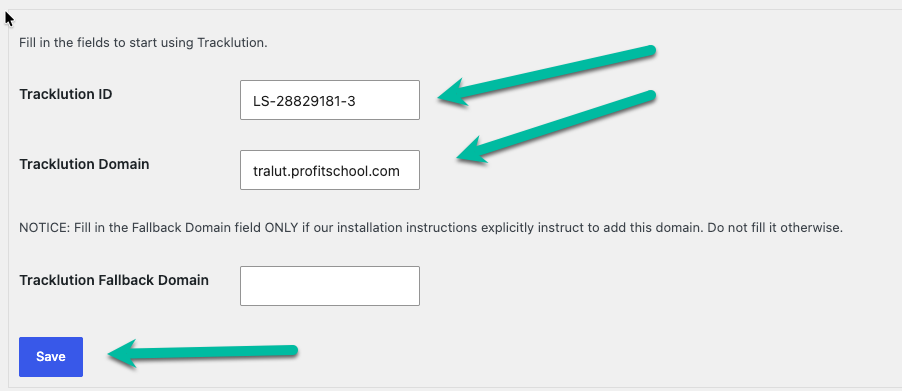
- Copy your tracking ID from Tracklution
- Paste it into the plugin settings
- Save
If you're on Shopify, there's a Shopify app instead. Custom sites get manual code snippets or GTM instructions.
Step 5: Trigger a Page View and Verify
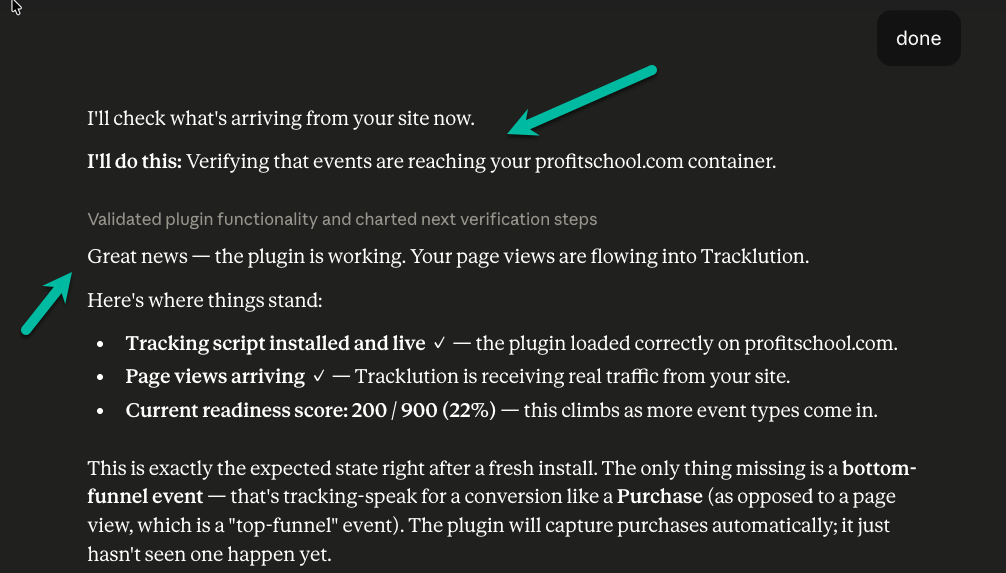
Open an incognito window and visit your site. This triggers the initial page view that confirms your tracking is working. Then tell Claude you're done, and it'll run verification automatically using Tracklution's built-in tools.
In Manisha's case, the response was: “Good news. The plugin is working perfect.”
Step 6: Test Event Tracking (If Possible)
For complete verification, you'll want to trigger an actual event: an add to cart, initiate checkout, or purchase.
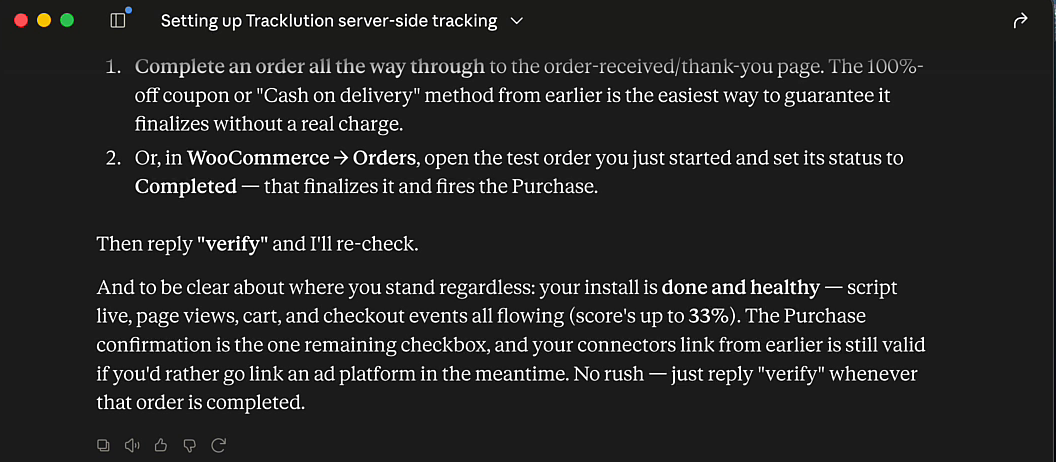
Manisha ran into a real-world snag here. The test site didn't have a working payment gateway set up, so triggering a test purchase took some creative problem-solving. (A coupon code zeroed out the cart, which actually worked.)
The honest reality? Test environments aren't always perfect. Sometimes you need to wait for real customer activity to verify purchase events are flowing.
Troubleshooting Common Issues
Cache Purging Problems
Some sites (especially WordPress with heavy caching plugins) need cache purged after installing new tracking code. Manisha had Cloudways open specifically for this reason. If your tracking isn't appearing after installation:
- Purge all caches (page cache, object cache, CDN cache)
- Try incognito mode to rule out browser caching
- Give it a few minutes to propagate
Events Not Showing Up
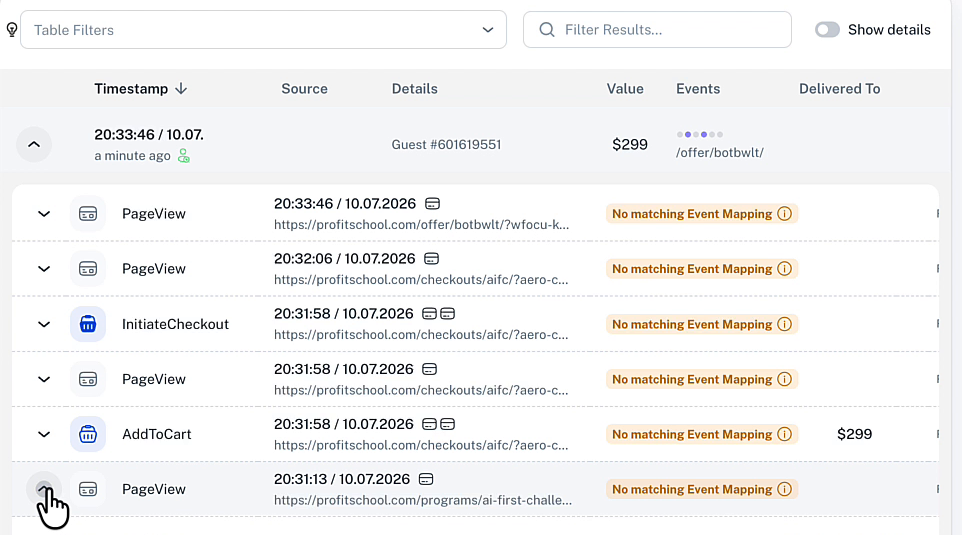
Tracklution's MCP server includes re-verification tools. If events aren't appearing:
- Ask Claude to recheck for specific event types
- Verify the order status is set to “completed” (pending orders won't trigger purchase events)
- Check your WooCommerce or Shopify event settings
Order Status Complications
For WooCommerce sites using checkout builders like FunnelKit, purchase events require specific configuration in the builder settings. If purchases aren't tracking but add-to-carts are, this is likely the culprit.
What Happens After Installation
Once your server-side tracking is verified and events are flowing, connecting ad platforms is straightforward.
Want to send initiate_checkout events to Facebook? Connect Facebook in Tracklution and the events flow through automatically. No additional tag setup. No extra triggers.
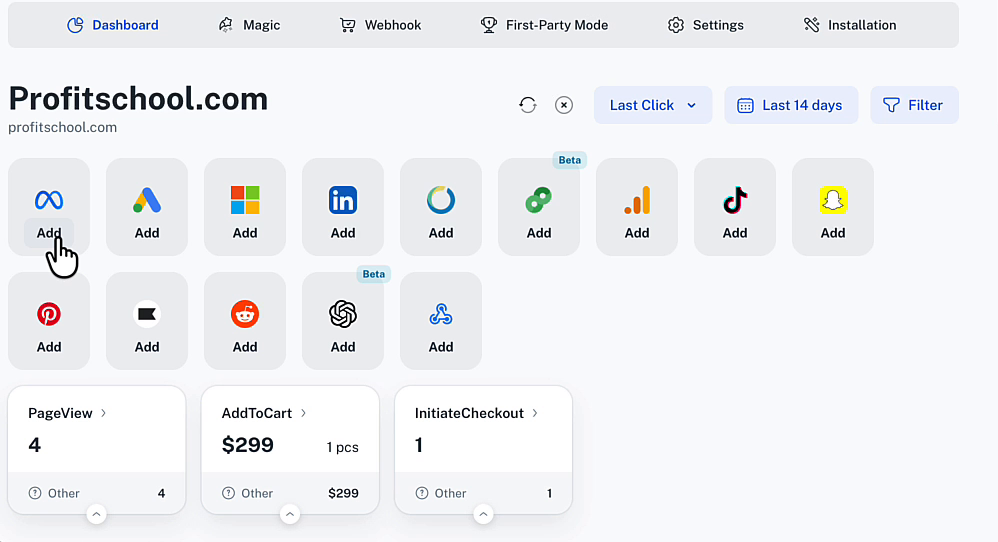
We covered this in detail in last month's Tracklution video.
FAQs
Do I need technical experience to do this?
Not really. If you can install a WordPress plugin and copy-paste text, you can do this. The technical complexity is handled by the conversation with Claude and Tracklution's backend.
What if my site isn't WooCommerce or Shopify?
The scout website tool will identify custom sites and provide either manual code snippets or GTM instructions. You'll have more hands-on work, but the process is still guided.
How long does the whole setup actually take?
2 minutes for the MCP connector. 5-7 minutes for the conversational setup. 3-5 minutes for plugin installation and verification. Call it 15 minutes total if everything goes smoothly.
Ready to Set Up Server-Side Tracking?
Here's your action plan:
- Install Claude Desktop
- Sign up for Tracklution
- Follow the steps above to connect the MCP server
- Start a conversation and let Claude guide you through
The best part? You can do all of this while handling other work. Server-side tracking setup just became background noise instead of a dedicated project. When you're ready, start your Tracklution setup here.